Rust and your Volkswagen.. the unfortunate pair
by Keith Park
pictures by Greg Merritt
While this article is written primarily for the Type 3 VW, it contains ideas that can be used in all cars in general.
First off.. just a few words on rust that not all people realize but are important in preventing it and understanding how the prevention works. Rust is hydroscopic, meaning it attracts moisture. Even if not out in the rain a car stored in a damp place will rust at an alarming rate. Rust will attract the water right out of the air.
Rust is capable of quite a bit of force. When Iron converts to Iron oxide it takes up more room and will force anything out of its way. Look at a rusty spotwelded seam. Notice how the layers of rust in the seam have bent the outer surface so that all the remaining spotwelds want to pop? Hear your brake discs making that scraping sound expecially after you have parked the car for awhile? It's rust between the splash shield and steering knuckle forcing the shield into the rotor and scraping against it.
What you should know about road salt. Road salt is also VERY hydroscopic, and once it gets sprayed into a rusty seam in its solute form, will remain there for many many years as its nearly impossible to wash out from the many layers of scaled rust. Road salt is a catalyst, meaning it mearly accelerates the rusting that ordinary water and steel do, unfortunately for us, its a damn good catalyst. Road salt is also very tempurature sensitive as are all chemical reactions, which means if you park a salty car in the sun on a spring day, with underfender tempuratures reaching the 120F region, it will rust at a MUCH faster rate than on a cold cloudy winter day. The WORST thing you can do to a cars body is park it during the winter and not drive it again, leaving it salty all summer long unable to cleanse its underbelley.
Factors Influencing the Speed of Destruction
A new car will rust at a much slower rate than a rusty car will. New cars have much less compromized or exposed metal, less places to trap salt and moisture. Cars driven on the freeway where the salt gets blown in all the seams at greater force will rust faster, even on a dry road the salt dust will get into everything, attract moisture and rust!
Quality of steel is also important, mainly how much carbon it has in it. Some cars have better quality steel than others. Wonder why those old GM cars had the thick frame and bumper steel rust through while the body sheet metal was still in good shape?? The bumpers and frame were made out of poor quality steel starting in about 1978. Cars with more dissimilar metals will rust faster as well unless the engineers prevent them from contacting each other. Electrolysis sets up and is catalyzed by the salt and next thing you know your bumper is bouncing down the highway in your rear view mirror. This is why the bumpers on 1978 GM's fall off but they dont in 79, in 78 aluminum brackets were bolted right to the steel, in 79 they realized their flaw and used an all steel mount.
Drive the VW in salt?? Get underneath and look at the fasteners on the tranny, where the steel contacts the very reactive magnesium the magnesium will be all corroded away. Now put a wrench on them.. OOH THEY'RE LOOSE! That's cause the metal that they tightened to is all gone. This is the cause of some oil leaks but once the oil leaks the corrosion is halted and leads me to the next part.
Slowing rust.. General ideas
Keeping the steel as dry as possible is the first step. Fix all your seal leaks to keep water out of the car. Floors rust from the inside out, mainly from leaky seals. Repair holes that allow water and salt to enter areas that they can collect. Welding on a patch is best but riviting on a steel patch will work too as long as it's sealed along the edges with roofing tar. Roofing tar will remain flexible, stick well, but does trap some moisture in the rust it covers so remove all the loose stuff to lessen this. Sandblasting surface rust is excellent but doesnt quite get rid of it all, there are still little fissures in the metal when it's heavily pitted, but most of the surface is clean and a good coat of primer and paint will adhere very well. The best is chemical stripping but it is expensive, you cant do it yourself, and you may not be near a facility that does it.
Oiling is the best and most practical solution, and unfortunately the messiest. Oil, when sprayed on in a vapor,(and I mean 10W40, NOT WD40) will penetrate the scale, work its way in all the seams, preventing the other ingredient, Oxygen, from reaching the metal. It penetrates so well that if you have plans to paint that rusty area in the future DONT oil it as you'll have a hard time getting the oil out of those fissures and the paint may not adhere everywhere. In these circumstances the Duro extend (or one of its naval jelly based copies) will offer the best protection painted right on until the finish work can be done.
Rustslowing your Type3
While I am known for uttering the unimaginable when I see a nice classic car in the salt, sometimes its... this is hard for me to say.. Unavoidable! I too drove my Salt free 71 Squareback through 4 winters while in college and endured the mean glares from all the other people in the club! Please Please dont use my suggestions as an exuse to use a classic in the salt if you can avoid it, there are things you cant protect and this procedure will just slow it, not stop it.
I'll start with what can be unbolted and replaced
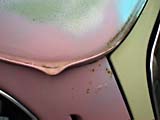
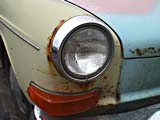
FRONT FENDERS: The late ones rust out faster cause the factory used an undercoating that usually cracks at the seams and then holds salt and moisture so start off by scraping away any loose/cracked or bubbling undercoating especially around the headlight bucket, rear top corner and the whole seam down the rear. Then blow oil in these areas and anywhere there is rust, even surface rust.

Blow Oil? you say: By this I mean use an undercoating gun (fairly cheap at any autobody shop) hooked up to 125psi with a good amount of CFM and instead of using undercoating use a good thick grade of oil, say 40 or 50 wt. DON'T use gear oil.. it smells too bad! If you use undercoating it will trap moisture in the seams and in the rust and won't stick too well to the rust eather. Undercoating won't travel deep into the rusted seam as oil will.
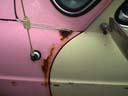
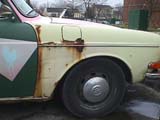
REAR FENDERS: There's one thing that needs to be done first, unbolt the 2 lower front bolts but dont snap them off if they wont come. Came loose? WOOHOO! now pull the fender out about 3 inches and drill an access hole (just big enough for the nozzle to go through) in the small horizontal area where the bolts went in. rusted out you say? then patch it up as described earlier and drill an access hole in your patch. Blow a quick shot of oil up in here. oil the bottom 6" or so of the fender too and if the paint's still really good use a little wheel bearing grease as the oil will flow off of smooth paint easily. Fender didn't come free? then shove the nozzle between the fender and the wheel well seal and shoot away. drill a hole in the horizontal triangular shaped spot in the very front of the wheel well at the bottom, shoot this with oil and plug the hole with RTV. remove the taillights and shoot the rear section of the fender with oil.
HOOD: These rust out along the front seam so just blow some oil in there and you're protected.
REAR DECKLID: These are pretty free of rust but again blow some oil in the bottom seam, especially on ocean cars.
DOORS: Very rust resistant but make sure the drain holes are clear and remove the interior panel and spray the lower edge with oil and up each end 8" or so from the inside. Check the lip that holds the seal in place at the bottom and if its rusty Duro-Extend it before oiling.
REAR WHEEL WELLS: they go at the seam in the middle if the factory undercoating fails, especially in front, they also go around the seatbelt mount plate in the front lower section and the very bottom of the front (where you already drilled the hole and oiled). If the holes aren't too big.. sandblast the seam (watch out for the sand getting IN the car) to remove all rust and paint those bare metal with primer and paint. Use RTV liberally to plug the holes (RTV will stick VERY well to CLEAN surfaces hence the paint) I did this 10 years ago on mine and it's still perfect. Once everything is dry blow oil on every remaining area of surface rust and in all the seams if they're not rusted through yet. Do that seatbelt mount well!!
REAR SUBFRAME: the area where the rear suspension assy bolts to the body (Box section) needs to be sprayed with oil INSIDE. There are generally some holes you can use but drill em if there aren't. Pay special attention to the frontmost lower mounts as this is where the problems show first.
REAR BUMPERMOUNTS: With the Squareback and fastback this is a box section where the mount is spotwelded. Drill an access hole in the bottom of the box and blow oil. Blow oil under the spotwelded mount too, there are drains at the bottom you can use.. If the box has some holes but is still sound you really don't need to patch them as long as there's oil in there.
Early Notches dont use the box section so just oil the spotwelded mount and late Notches (up to 69) have a reinforcement piece that needs to have oil blown all around it and behind. Very late Notches have the box section like the others (I think) and should be treated as described above.
REAR BUMPER: These catch crap and all should be sprayed with oil inside.
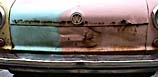
NOTCHBACK LEFT AND RIGHT BENEATH REAR WINDSHIELD: you can get these spots from the area where your rear lid springs are, just spray them up and get all the seams in this spring area as well as the lower spring mounts.
COASTAL SQUAREBACKS: the body near the rear hatch mounts goes cause there's moisture trapping foam in there. Pain in the ass but pull that part of the headliner and inner vinyl away and give a little shot of oil. BE CAREFUL.. you're INSIDE your car now and can make a real mess with the oil REAL quickly. If it looks good around there under the liner it's best to just leave it. Only the coastal cars have problems here.
ROOF: Yep! the roof on sunroof models is a problem some of us know the "details" of. Where the sunroof section seals around the roof in back condensation can rust through the roof. Blowing oil in there risks ruining the headliner so use a paintbrush on a long rod, also check the drain channels on the sunroof assy itself, these have been known to rust through. If these areas look good I'd leave them alone. Its more of a problem on coastal cars.
PAN AND ASSY: if there's surface rust on the inside under the mats use the Duro Extend as described above and seal all the leaks. Underbelly should be oiled if there's surface rust and shoot some oil up the reinforcing channels in the middle of each side. I've also seen the bottom of the frame tunnel rust out from the inside but this is caused by water leaking in. Shoot some oil up into the front framehorn through the lower drain holes at the bottom of the front mounts.
ROCKER ASSYS: Here's what we've all been waiting to hear about! they rot badly for 2 reasons: first they get a hole rotted through the front at the back of the front wheel well and then all the salt and crap gets shot down the whole length of the rocker by the front wheels.
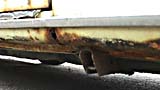
Secondly, the drain holes in the top continually allow moisture to drain through the rockers and since there's not much primer or paint protecting the metal inside them they rust.
Start by removing your aluminum sill plates and seal the 3 drain holes with RTV. How bad are your rockers? there's at least 3 layers: the outer skin, the inner skin and the round heaterchannel which gives no structural help. If the outer skin is prettywell rotted off so you can access the inner skin drill a couple holes in it and blow oil between it and the heater tube, (you might get some smell as some burns off with the heat on high but be careful not to drill through the round heaterchannel or oil into it if it's rusted through too. Oil between the inner and outer skin too. If your rockers are intact drill access holes in the front and rear about 1/3 way from each end on the bottom or remove your trim and use these holes. Blow oil in here real good! the atomization of the oil at 125psi will really spread it good. when it's all dripped out cover the access holes. Lastly, take the nozzle, hold it against the gap between the pan and rockerpanel on the bottom, put on the faceshield I forgot to reccomend you use earlier, and pull the trigger while running the nozzle down the whole length of the rocker/pan gap. WHEW! what a mess but boy you're protected now!
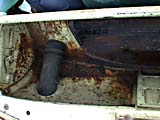
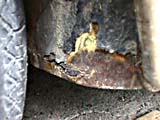
FRONT WHEEL WELLS: Starting in 1970 with the new body style they stiffened up the front end with a steel stamped plate spotwelded to the upper rear of the front wheel well. Boy this was bad news! they had drain holes top and bottom and of course the ones on the bottom plugged up so the ones on the top could let all the water in and fill up the space between this plate and the trunk skin and rot the whole thing out at an alarming rate. The expansion chamber strapped to this plate on some models on the left side also did an admirable job of holding gobs of dirt and salt up there. If yours are all rotted out you've got some patching to do, if they're only small holes you can sandblast/paint/RTV them up as described for the rear wheel wells. At any rate drill some vent/access holes in the trunk side and oil up the inside of this moisture trap and leave the holes OPEN to prevent future condensation. SEAL all the drain holes on the fenderwell side, top and bottom, as well as the whole seam around this plate with RTV (remember RTV only sticks well to CLEAN surfaces), do this before oiling.
Behind the wheels is also a classic spot, the seam between the pan and wheel well gets crap caught in it and there's a body seam down there so clean it all out good.
Now.. go inside your car and pull up the floor mats and pull the carpet away from the body subframe where the body bolts to the pan at the rear of the front wheel wells. This is a seperate piece that is spotwelded to the inner fender well and these seams go. Drill access holes in the top of the piece that bolts to the pan and blow oil in this channel (watch your interior with the oil!). Next, go outside again and take the nozzel and blow oil in the seam at the bottom where the pan and body meet at the rear of the wheel well at the bottom. You already fixed all the rust holes right? otherwise you probably don't want to look in your interior now!
Front bumper mounts are VERY susceptable to rust, you can easily drill access holes for the oil from the spare wheel well though. You want to fill the space between the fender well and mount bracket with oil.
Headlight buckets suffer from failure of the factory undercoating so scrape and peel away all the loose stuff and oil the backside of the bucket real well.
Lastly take the gun and spray all surface rust in the wheel well and the seam where the fender mounts and the trim holes
FRESH AIR VENTS: early ones up to 68 or so are removable assemblies that come off to be sandblasted and welded/painted up seperately. In 68-70? they used plastic ones (Smart!)...
...but in 71 they became a large sheetmetal tray spotwelded on which fills with dirt and rots out on the bottom and where it spotwelds to the trunkwall. No holes anywhere? check the hump wall at the back of the trunk (you have to peel off the padding)...
and if it's still good blow oil in the vent openings after hosing it all out real good and letting it dry. Rust on these late ones must be fixed by drilling out all 18 or so spotwelds on the trunkwall with a spotweld cutter and removing the cover (after removing the wipers, fresh air system etc). Then you can weld a patch in the trunkwall and on the tray and sandblast/ paint everything. Bolt it up with a new seal and you're all set.
FRONT BODY SUBFRAME: This is the box section to the left and right of the fuel tank, where the fuel tank rests. You can spray it up in there from the openings in the front and getting a lot around the point where the front axle beam clamp mounts. Spray around the fuel tank lip from the underneath too.
FRONT AXLE BEAM: Front axle beams are notoious for rusting out under the clamps and having the ears rot off. Water then gets in and ruins the bearings and rusts the torsion bars causing them to break. The rust is worst in the outer corners of the clamps on top and when it goes there you can generally never get the spline of the broken torsion bar end loose again. This was the last gasp for many a type 3 seen in a junkyard.
The best way to rustslow it is to remove the clamps and rubber bushings and grease underneath them but being such a major job just spray oil around the clamps. Drill an access hole in the bottom of the ears and blow oil up in there too. I even remove the torsion bars and grease the length of the bar so condensation doesn't rust the bar causing it to fail and I've never had a failure.
FRONT APRON: just lay a little oil around the bottom seam so it won't rust out there either
LASTLY: Wax all your chrome and aluminum and dont wipe the wax off. get in the pits on the potmetal real good too, Look like crap? Yea! but it's protected.
CONGRATULATIONS!
Your car is an absolute mess underneath but it's pretty well protected. I did the complete procedure every 2 years and catch the high wash areas in between. Best time to do it is in the fall so the coat's fresh for the winter but don't do it after the first salt as it may trap the salt that's in the seams. Giving it all summer to wash out is the best you can really do. Park the car where it can drip for a few days and then wipe things down with a rag. It won't be so messy after a winter of driving and who wants to be under their car in the winter anyhow.
WHAT IT WON'T PROTECT: Engine tin, heaterboxes and tubes, exaust systems (good for 2 winters only), most chrome, inside of heater channels (from the salt dust getting blown through everything), your nuts and bolts will rust up, engine and transmission case. Brake splash shields, calipers and rotors won't last nearly as long and the sandblasting effect of the road salt and sand on your paint and windshield is much worse in the winter. Lastly, the salt WILL still get in the seams as the oil eventually washes out and rust things.
Keith Park 12/19/97
71 Squareback
65 Notchback